Categories
Display

Preparing PageOneX 1:1 scale and front page analysis references

Preparing PageOneX 1:1 scale

PageOneX: How newspapers tell the story proposal for the Media Lab Festival
PageOneX: How newspapers tell the story? This is how the project would look like at the MIT Media Lab Festival

I am preparing a project for a physical display of a PageOneX visualization at the MIT Media Lab Festival for April 2013. I blogged about it and also gathered some references about front pages in art and cinema.

Front page analysis references

We’ve opened (with Rogelio López) a section of the website to gather articles and books related to front page analysis.

This is the open document: http://brownbag.me:9001/p/pageonex-references
I’ve also copy-pasted the content into one of the sections of the pageoenx blog: http://montera34.org/pageonex/references/

Help us get more examples of front page analysis!

Updates on PageOneX development

Testing a new way of visualizing all the threads.

I hope that by late April we’ll have a new version of pageonex.com available. You can check all the things that we are fixing or suggest yours.

Meanwhile you can use the buggy alpha version or install it in your own computer.

Categories
Data Model

Intense PageOneX activity in a cold February

A cold February is a perfect month to move forward and start developing again. I’ll list some of the things that have happened this past intensive weeks:

Press Coverage

Categories
Deployment

The easy way to run your own PageOneX deployment in heroku

This is an easy way to set up your own version of PageOneX in Heroku, and make the process easier than in the last post about this topic.
Heroku is a free hosting service to test web apps. The free service allows you to run your app with a limit in its data base.
If something is not clear, ask in the comments. We’ll updating this post.
You’ll need:
Let’s say you want to create your app named “pageonextesterx”. It will have the url: http://pageonextesterx.herokuapp.com.  “pageonextesterx” must be an unique name, no other app should have your chosen name. So change it!
Run the following commands in a terminal (tested with ubuntu)
git clone git@heroku.com:pageonex.git
It clones (downloads) the files for the deployment. You can also download them from: http://pageonex.com/pageonextester-heroku-1.0.1.zip
Create your app at Heroku:
heroku create pageonextesterx
For this you’ll have had to create your own Heroku account before and choose a name that no one has taken before.
Go into the created folder.
cd pageonex
Edit the git config file at .git/config
nano .git/config
or use
gedit .git/config
The file will open in the “nano” editor or “gedit” editor. You can also go to the hidden folder .git and open the “config” file.
Once inside you have to change “git@heroku.com:pageonex.git” by “git@heroku.com:pageonextesterx.git”. This will tell Git where to upload your files. If you try to upload (push) to “git@heroku.com:pageonex.git” you will not have the rights to do it.
Now you are ready to upload your app:
git push heroku master
You will need to upload your ssh key to heroku. You can find it (in ubuntu) at /home/.ssh/id_rsa.pub, and have to copy paste in your heroku account settings page.
To view hidden files you have to activate view of hidden files.
It will upload your files to your deployment. Now you need to run more commands:
heroku run rake db:migrate --app pageonextesterx
We are adding “–app pageonextesterx” is to specify which of the apps that you have it’s being used.
heroku run rake scraping:kiosko_names --app pageonextesterx
Go to http://pageonextesterx.herokuapp.com. You are ready to go!
Note: We hope to have soon our own deployment running at pageonex.com, so you don’t have to install your own. We are providing you with this manual to help run your own deployment. Running it in your computer is more difficult than doing it remotely in eroku, as you do no have to install rails, ruby or the gems associated with the project.
Categories
Uncategorized

PageOneX: timeline for a work in progress

I’ve been reorganizing all the material related to PageOneX in this timeline, made with the amazing TimelineJS. The idea is to move forward and have a first beta version, the alpha is having too many bugs, report them if you see some!

Find more info about the project at pageonex.com

For better navigation you can see a full screen view of this timeline.

Categories
Deployment

Helps us find the bugs!

We know that deploying PageOneX on your own server or in Heroku is not an easy task. Before we deploy it in its final destination, pageonex.com, we want to hear from you

Test the tool at http://pageonex.herokuapp.com or at http://pageonextester.herokuapp.com (for the latest updates)
And report the bugs: http://bit.ly/pageonextest and give us some feed back!

Categories
code Deployment

How to deploy PageOneX on Heroku and the required changes

We are going to deploy the latest version of the project on Heroku first and then we’ll see what we need to change if we want to deploy this version on local machine or a server.

Heroku deployment:

This link from Heroku dev center “Getting Started with Rails 3.x on Heroku” is covering the basics needed to connect to Heroku and deploy, which is a very simple process and it relies on git, and the three main commands is:

Creating the application on the Heroku to deploy on, you run this command from the project directory

 heroku create pageonex

And then push the project to the Heroku server via git

git push heroku master

Last command is to run the migrations, and that’s it

heroku run rake db:migrate

There is an important note, which is Heroku is using PostgreSQL for the production, so you will have to install PostgreSQL on you’r machine first, and the “pg” and run the bundle command before pushing the code

Installing PostgreSQL isn’t easy, and configuring it is much complex than MySQL for example, so my suggestion if you are not interested to use PostgreSQL (which you can do) so at least install it, so you’ll be able to install the pg gem and bundle the gems

The limitations of Heroku deployment, and how we are dealing with it:

  • Disk storage limitation which was causing this images low resolution problem, and this is happening because Heroku remove any images after few hours of storing them, and if the thread contains a huge number of images, so it will fail.The solution for this problem was that we’ve decided not to store the images on the disk, and we will use the direct links from Kiosko to display the images, so because we are trying to fetch many images from the same domain, so Kiosko server send the 300px images instead of the 740px to reduce the bandwidth, but we’ve added the original link of the image beside each image, so if you want to see the full image, you can copy and past the link in a new tab, and we didn’t use a direct link, because it’ll cause the same problem because the request comes from the same domain
  • The processing power is very limited (because it’s a free version for sure) so we are not be able to use any image processing libraries in this version like “RMagick”The solution is to comment this library, and use other ways to get the images coordinates (this was the use of RMagick in the kiosko scraper) and not to use the elpais scraper, because it use RMagick to convert the pdf scraped file into images
We are going no to see how to remove the limitation changes in the Heroku deployed version to back to the original code, because we have commented the parts which can’t fit for Heroku, instead of creating new branch for this version, so we’ll list all the files which have to be change, and which parts will have to change exactly in this files
The files that we’ll need to change, and the lines inside each one related to this, to add more highlighted areas:
  1.  app/assets/javascript/coding.js
    line 116-117:  change this with a loop over all highlighted areas
    line 161: change this method to loop over all highlighted areas
    line 229: change this method to  loop over all highlighted areas instead of checking with if statement for each one
    line 338: change this as the line 229
    line 297: change this to loop over all highlighted areas
  2. app/assets/javascript/display.js
    line 43: change this method to loop over all the highlighted areas
  3. app/views/coding/display.html.erb
    link 150-152: replace this two line with any number of highlighted areas
  4. app/views/coding/process_images.html.erb
    link 96-98: replace this two line with any number of highlighted areas
  5. app/controllers/threads_controller.rb
    line 133-136, 278-285: change this with any number of highlighted areas
The files that we’ll need to change and the lines inside each one related to this to, to switch to the older version, where we download the images and store them:
  1. lib/scraper.rb
    line 4: un-comment the RMagick library
    line 29-35: un-comment this part were we open the images links and path their content to saving method
    line 37-39: delete this part
    line 118-126: un-comment this part which save the downloaded image to the disk
    line 130-136: delete this part
  2. app/controller/threads_controller.rb
    line 95-96: un-comment this part, to get the images size
    line 98-100: delete this part
    line 105-106: un-comment this part
    line 234-235, 243-244: un-comment this part
  3. app/views/threads/index.html.erb
    line 21: un-comment this to get the images from the local storage
    line 23-25: delete this part
  4. app/views/threads/new.html.erb
    line 7-10: delete this part 
  5. app/views/coding/display.html.erb
    line 135: un-comment this line
    line 137-148: delete this part
  6. app/views/coding/process_images.html.erb
    line 60, 74: un-comment this line 
    line 62-68, 76-83: delete this part
  7. app/assets/javascript/coding.js
    line 216-219: delete this part
  8. app/assets/javascript/display.js
    line 141-144: delete this part


Notes on the pending feature, and how they can be implemented

  • Exporting the display result as an image
    The gem we’ll need is IMGKit, and in the coding controller we’ll use this gem to convert the rendered view into image
  • Create user profile pages
    We’ll override the user controller of Devise, and add a view for the user profile pages
  • Implementing tags
    To implement the full featured tags we’ll need to use ActsAsTaggableOn

Categories
Uncategorized

PageOneX Version 1.0 – An Overview

We have just release the version 1.0 and deploy it on Heroku http://pageonex.herokuapp.com/ we’ll walk you through this release and the features available and which will we planning in the next release.

Home:

At the top you can see the main bar, and the important item is the first one which “Threads” menu, that give you a link to all your threads, and all the threads that have created on application

Threads:

Listing all your threads, and you can show, delete or edit them, and you can also browse all threads on the application, but you’ll just be able to show them

New Thread:

Creating a new thread requires few information about that thread, most important fields is start date, and end date, which depend on status option, if it’s an opened or closed.

What is meant by “Opened” and “Closed” threads:

  1. Opened thread: This option means each day PageOneX, will scrape the latest newspapers front pages related to the thread automatically
  2. Closed thread: This option means the created thread will not be updated and PageOneX will not scrape any newspapers front pages automatically

And then you can select multiple newspapers, and the topic name and color.

Coding:

Coding images, or in other words highlighted related news, there is multiple parts in the coding view, first at the top you can see is the progress bar which is showing; how many images that you have coded, and how many are left.

Then; on the left side there is information about the current image, and the codes, and on the right side there is some helping tips

How coding works

Steps

  1. Drag the mouse over the related news box
  2. Release the mouse when you have covered the box
  3. If there is nothing to code, you can press the button at the bottom “Nothing to Code”

    Notes

  • The progress bar at the top page shows how many images have been coded, and how many is not yet coded
  • You have two highlighted areas to use
  • If you cannot highlight a long news box, you can zoom out and highlight and then zoom in, or you can start with small highlighted area and then resize it

Display:

Showing the coding result with bar chart visualization, this view is divided in two main parts, first part which is at the top, contains the basic info of the thread and a button for downloading the thread in image form, then the part at the bottom consist of two parts the first part is the bar chart of the surface percentages, and the second part is matrix of all the images with the highlighted areas.

Features will be available in the next version:

  1. Allow multiple user to code in the same Thread
  2. Allow multiple topics code
  3. Users will be able to create more than two highlighted areas
  4. Scrape over multiple months


Categories
Display User Interface

Display View – An Overview

In the last post I’ve did an overview of how Coding works, so in this post I’ll walk you through the Display view and how it works

Let’s start with the basic structure of the display view it self;

Display view is divided mainly into three horizontal sections

  1. First section; contains information about the thread, basic information (name, description, status, starting date and ending date) and then number of boxes representing the  codes and their colors
  2. Second section; contains the bar chart of the calculated “Surfaces Percentage”, it’s not working in this snapshot but it will be working soon.
    We are using Rickshaw which is JavaScript toolkit for creating interactive real-time graphs, and to use it we have to include three files as the following
    <%= javascript_include_tag “d3.min.js”, “d3.layout.min.js”, “rickshaw.min.js” %> and then create an object from Rickshaw.Graph and pass the JSON object of the information to display which is the surfaces percentage for each day in set of images from different magazines, I’ll write about how this values can be calculate exactly in another post after deploying the beta version
  3. Last section which showing the the highlighted images, each newspaper images appears in an individual row
    I’ll try to explain here how we load this images and arrange them in rows and calculate the size of highlighted areas and their position;

    1. First how to calculate the size of the images based on the size of the page, specifically the size of the div which contains the images of a newspaper:
      1. gets the width of the row div which contains images for any newspaper
      2. gets the number of images in a row
      3. divide this width by the number of the images, to specify the height of each image
      4. then calculate the ratio between the original image and the new image size
      5. based on this values I do set the images size and highlighted areas
Try to zoom in and out and you will see how the images and the highlighted areas are calculated, that is happen because I’ve also bind the handler with resize event on the window object
Categories
code User Interface

Coding View – An Overview

I’ll give in this post a technical overview “Coding View”, and how it works and why I’m using specific library, plugin, or even techniques.

Let’s start with the basic structure of the coding view it self;

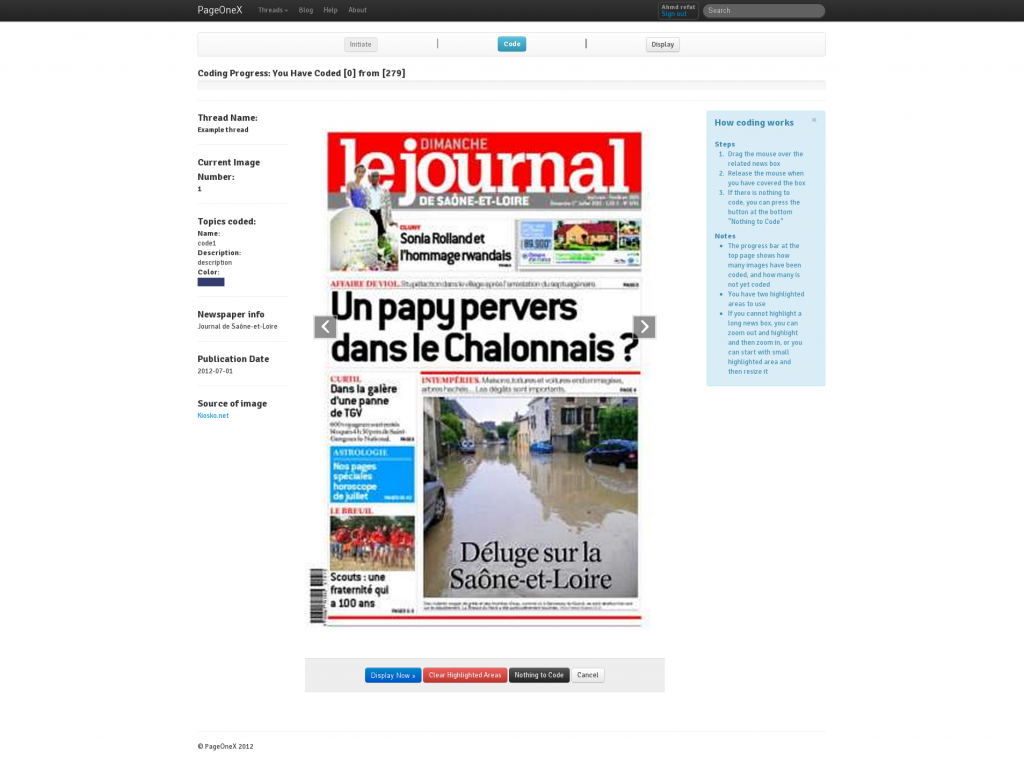
Coding view divided mainly into two parts:
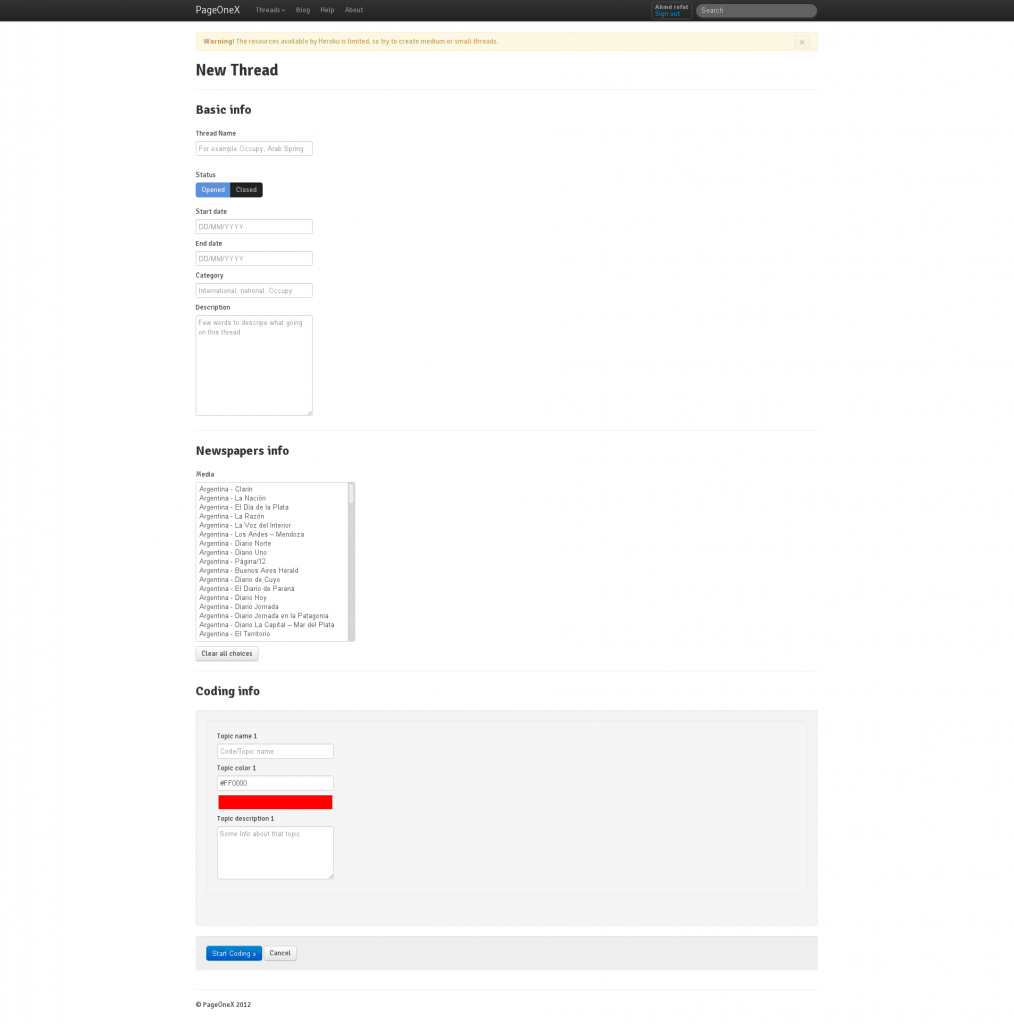
1 – The left side part which contains the list of codes and their codes, in a colored box (users decide the color of each box in initiate step), and then Newspaper info (name, publication date, image source)

2 – The right side (or the middle part, because the right side is part of the layout) which contains the images slider “Carousel”, and we have faced two options for displaying images in Coding view:

1 – The first one is to display image by image and submit each image highlighted areas values by itself, and the problem with this is the following; first even if the user coding 10 images it take time and the user will even take time to skip images and back to them later, so the main problem was the navigating between images, but this option was much simpler to handel on the front side and even on the server side, becuse we will be dealing with only one image at a time, but for scalability purpose it will be bad, and we will need to refactor a big part of the code for larg set of images

2 – The second one, which we actually using now is using a bootstrap jQuery slider plugin http://twitter.github.com/bootstrap/javascript.html#carousel, to display a large set of images with a very easy navigation way, so users can slide to any image to code first and the back again to the uncoded images, the problem with this option is it impose more complexity on how to store the highlighted area in the browser and how to submit this values to the server

Before explaining how we store highlighted areas, we should know how we generate them, which is done using imgAreaSelect jQuery plugin http://odyniec.net/projects/imgareaselect/ which is simple and easy to use.

I’ll explain now how we store highlighted areas in the browser: we are using hidden fields to store the values of highlighted areas, line 3 show hidden field with an id for instance “image3_ha1” with default value “0”, and this field is used to tell us if highlighted area number “1” is used with image or not, then line 4 which store the code id which this highlighted area is represent, by setting the number we can decide the color of the highlighted area (I’ll explain this part after this), then line 5 which stores the x1 value and so on for the following fields (for now we are using x1,y1, width, and height to draw the highlighted area only) and the same for the fields starting from line 11, the differenc is that it represent the other highlighted area

We are using just two highlighted areas to code, but we are going to make it unlimited in the next version

  1. <% @image_counter.downto(1) do |ic| %>
  2.  <div id="image<%= ic %>">
  3.   <%= hidden_field_tag "image#{ic}_ha1","0" %>
  4.   <%= hidden_field_tag "image#{ic}_ha1_code_id","0" %>
  5.   <%= hidden_field_tag "image#{ic}_ha1_x1" %>
  6.   <%= hidden_field_tag "image#{ic}_ha1_y1" %>
  7.   <%= hidden_field_tag "image#{ic}_ha1_x2" %>
  8.   <%= hidden_field_tag "image#{ic}_ha1_y2" %>
  9.   <%= hidden_field_tag "image#{ic}_ha1_width" %>
  10.   <%= hidden_field_tag "image#{ic}_ha1_height" %>
  11.   <%= hidden_field_tag "image#{ic}_ha2","0" %>
  12.   <%= hidden_field_tag "image#{ic}_ha2_code_id","0" %>
  13.   <%= hidden_field_tag "image#{ic}_ha2_x1" %>
  14.   <%= hidden_field_tag "image#{ic}_ha2_y1" %>
  15.   <%= hidden_field_tag "image#{ic}_ha2_x2" %>
  16.   <%= hidden_field_tag "image#{ic}_ha2_y2" %>
  17.   <%= hidden_field_tag "image#{ic}_ha2_width" %>
  18.   <%= hidden_field_tag "image#{ic}_ha2_height" %>
  19.  </div>
  20. <%end%>

We are using bootstrp jQuery modals plugin http://twitter.github.com/bootstrap/javascript.html#modals to allow users to select the code of a highlighted area the following snippet shows how codes colors attached to the options, and it’s important to point this part because; loading codes colors fetched from this elements, in line 3, we have added an attribute to the radio button element called “color” and sets it value with the code color, and also code_id element to store the code id, this two attributes is very important, becuase we are using them to set the highlighted areas colors

  1. <% @thread.codes.each do |code| %>
  2.   <%= radio_button_tag "codes", code.code_text, false, color: code.color, code_id: code.id %> <%= code.code_text %><br>
  3. <% end %>

Last part which is submiting buttons at center part, “Display Now” button which will direct the user to display view, “Clear Highlighted Areas” which will reset all hidden fields values and highlighted areas, “Nothing to Code” which will add a box of the images saying “Nothing to code here” (will implemented soon), last button “Cancel” which will delete the thread (will implemented soon)

Categories
meetings

Reviewing Version 0.1 and organizing milestones

We spend our last meeting reviewing the milestones we’ve created to manage the large ammount of issues we have pending in Github. The version 0.1 is working!
Notes from our July 10th 2012 meeting:
Reviewing bugs-features 1st milestone 0.1
  • Second time I run the app I get: “An error occured while installing factory_girl (3.0.0), and Bundler cannot continue.”
  • Listing of all the front pages images in display view. Fixed. Just commited.
  • Sometimes the scraper fails. Limitation of dates? For example: October 2011 fails…. fixed. Line 0 of lib/scraper.rb remove the 0, it was causing problems for months 10, 11 and 12.
2nd milestone. Review 0.1.1. July 11th 2012
Scraper
  • Add the limit date for kiosko when creating a thread. Is it different for dif newspapers? I think so. It would be great to hae a messsage like: “x images from x newspapers have not been found.” We should build and scraper (for future updates) to detect when a newspaper got in kiosko.net)
  • Edit: thread features (see highlighted areas in the coding view once you come back from display). Which thing will not be edtitable? Dates and media could not be changed, so the scraper doesn’t run again.
Coding:
3rd milestone 0.1.2  July 13th
Coding view:
  • Question: when coding large ammount of images, it is difficult to know where we are? which order the newspaper would appear? Order by date and not by newspaper? Let’s try to order by date.
Display view:
  • Newspaper by row https://github.com/numeroteca/pageonex/issues/31 Newspaper name in the first column.
  • Creating thumbnails for front pages https://github.com/numeroteca/pageonex/issues/22 and resize those thumbnails, not the full size pages.
  • Add link when you click on an image, so you can re-edit it.(recode images)
  • Add dates to have a reference (for each column of images shows the date of them)
  • Quantification of highlighted areas: bar graph.
  • Colors of codes in display view.
4th Online test 0.1.3 July 15th 
  • Online test? We need an online version for beta testers. Which are our need in term of server, domain… so I can prepare. We can use http://www.heroku.com/ for first test, and then start building it in our own server.
  • Compatibility with other browsers: (bootstrap itself provide this feature ) http://twitter.github.com/bootstrap/
Beta testing!
5th milestone. Dey: To be decided.
Online
Build the tool in our own server pageonex.com
Open Id acces or Twitter…
Scraper – creating thread:
  • Open/close feature
  • Select media sources (frontpages) from different moths. Now we can only select days within a month.
  • Be able to select scraper source:
    • Kiosko.net
    • [the other built in our scrape.rb El País, NYT
  • While scraping: show files that are being downloaded/failing
  • Show which threads are opened (all threads) and be able to search.
Display view
  • Export graph and data
  • Select / unselect newspapers
  • Select order in which newspaper appear.
  • Question: how non-coder will be view the display? any diference in the links to coded image?
Posting
Ahmd should start posting more regulary:
Start with a post about the Coding view.
  • Why jquery carrousel vs. single view.
  • How highlighted ares are handled, gem used? storing coordinates? storing width-height?

And keep going with other issues to explain different decisions in the development process.